lakutata-demo
💫 Description
Lakutata is a generic development framework written in TypeScript and designed with IoC principles. Its main objective is to provide a universal, efficient, and stable development framework. The design goals of Lakutata are not limited to web application development; it aims to serve as a foundational framework for desktop applications, embedded systems applications, and web applications. The framework primarily adopts an OOP (Object-Oriented Programming) approach and encapsulates functionalities such as subprocesses, threads, permission management, and database ORM, enabling the framework to be used out of the box.
In addition, Lakutata also supports the integration of third-party libraries into the application, allowing developers to freely encapsulate and call third-party modules using Lakutata’s dependency injection.
💫 Framework core
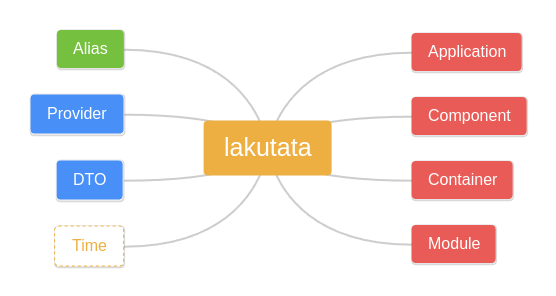
lakutata framework the core of main contents include: application instance objects, application components, containers, and modules,such like the picture. and alias、 proveder、dto、time is suport
💫 use
- install lakutata dependency
npm i lakutata
- install dependency
npm install
application init
We uselly init App begin from setting Application options.after initlization options finished,We will get the new application instance that needs to be configured.
Application
    .env({ TEST: '123' })
    .run( new Configuration().config())
    .alias({
    }, true)
    .onLaunched(async (app, log) => {
        log.info('Application %s launched', app.appName)
    })
    .onDone(async (app, log) => {
        log.info('Application %s done', app.appName)
    })
    .onFatalException((error, log) => {
        log.error('Application error: %s', error.message)
        return 100
    })
there has five configure option by Application:components、bootstrap、providers、modules、objects.
Here we provide a simple example
Interduce
- Application
- Component
- Container
- Module
- Alias
- Provider
- DTO
- Time
description
-
Application Application is main Module,That Class base on Module Class,We can init it and inject the applicationton object into the DI container(rootContainer)
-
Component Component is extended based on the Provider class. Each component has its own internal container. After instantiation through injection, you can use global calls. The component provides communication methods between other components such as emit and listening. ```typescript
public config(): ApplicationOptions { return { id: this.options.id, name: this.options.name, timezone: this.options.timezone, components: { db: { class: Database, options: DataBaseConfig(this.options.isProd, DatabaseType.MYSQL) }, testOrmCompoment: { class: TestOrmComponent }, testAliasComponent:{ class:TestAliasComponent }, emitEventComponent:{ class:EmitEventComponent } }, bootstrap: [ // ‘testModule’, // ‘testComponent’, // ‘testProvider’, ‘entrypoint’ ] } }
First, declare the component information in the configuration file, and then inject it into the object used to instantiate it.
```javascript
import { Component } from "lakutata";
import { Database } from "lakutata/com/database";
import { Logger } from "lakutata/com/logger";
import { Inject } from "lakutata/decorator/di";
import { User } from "../entities/db/User";
import { EmitEventComponent } from "./EmitEventComponet";
export class TestOrmComponent extends Component{

    @Inject()
    protected readonly log: Logger

    @Inject('db')
    protected readonly db:Database

    /**
     * if you want todo something when compoment initlization, please wirte here
     */
    @Inject('emitEventComponent')
    protected readonly emitInstance: EmitEventComponent

    protected async init(): Promise<void> {
      console.log('TestOrmComponent init!')

      //listen other component emit event msg
      this.emitInstance.addListener('testEmitEvent', (res) => {
        console.log('TestOrmComponent Listener:', res)
      })
    }

    public async get(){
        const data= await this.db.getRepository(User).findAndCount()
        console.log('data',data)
    }
}
3. Container
Dependency container include application、component、module、provider
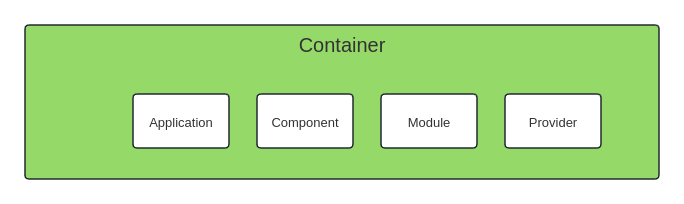 The container can inject not only objects within the framework but also some custom components or objects. Injection is achieved by declaring references.
import { Component } from "lakutata";
import { Database } from "lakutata/com/database";
import { Logger } from "lakutata/com/logger";
import { Inject } from "lakutata/decorator/di";
import { User } from "../entities/db/User";
export class TestOrmComponent extends Component{


    @Inject()
    protected readonly log: Logger

    @Inject('db')
    protected readonly db:Database

    /**
     * if you want todo something when compoment initlization, please wirte here
     */
    protected async init(): Promise<void> {
        this.log.info('TestComponent initialized')
    }

    public async get(){
        const data= await this.db.getRepository(User).findAndCount()
        console.log('data',data)
    }
}
Declare a TestOrmComponent, and then add a declaration to the configuration to tell the system the configuration of this object.
    public config(): ApplicationOptions {
        return {
            id: this.options.id,
            name: this.options.name,
            timezone: this.options.timezone,
            components: {
                db: {
                    class: Database,
                    options: DataBaseConfig(this.options.isProd, DatabaseType.MYSQL)
                },
                testOrmCompoment: {
                    class: TestOrmComponent
                },

            },
            bootstrap: [
                // 'testModule',
                // 'testComponent',
                // 'testProvider',
                'entrypoint'
            ]
        }
    }
the options component property name must the same as inject method name,if not wolud not be useful
4. Module
Module base on Component
5. Alias
Alias definition is used to specify the path and obtain a stable path address in the program,We usually define it when the program initializes the configuration,such like this:
import { Application } from 'lakutata'
import { Configuration } from '../config/Config'
import path from 'path'

const configuration = new Configuration()

Application
    .env({ TEST: '123' })
    .run(configuration.config())
    .alias({
        '@rootPath': path.resolve(__dirname, './file'),
        '@xml': '@rootPath/xml'
    }, true)
The Alise alias and the specified path are configured here. When running the application, we will get the correct path.
import { Application, Component } from "lakutata";
import { Inject } from "lakutata/decorator/di";
export class TestAliasComponent extends Component {

    @Inject(Application)
    protected readonly app: Application

    public async getPath() {
        const path = this.app.alias.get('@xml')
        console.log('path',path)
    }
}
Use the alias of the app instance to get the path
6. Provider
The provider is responsible for providing methods to obtain basic objects and program running environment variables. For example, the env of the node process, we can add some custom env to the process.env
import { Application } from 'lakutata'

Application
    .env({ TEST: '123' })
//after set env you can get in process.env
//process.env['TEST']
7. DTO
HTTPAction
Dto is often used to verify whether structures and values meet requirements,you can used it for controller param,component,object,such like that:
    @HTTPAction('/test2', 'POST',TestDTO)
    public async test2(ipn:ActionPattern<TestDTO>){
        return 'Validate success!'
    }
request demo
curl --location --request POST 'http://127.0.0.1:3000/test2' \
--header 'User-Agent: Apifox/1.0.0 (https://apifox.com)' \
--header 'Content-Type: application/json' \
--header 'Accept: */*' \
--header 'Host: 127.0.0.1:3000' \
--header 'Connection: keep-alive' \
--data-raw '{
    "id":"12312131",
    "count":213
}'
CLIAction
DTO strict option is useful,If you use the Cli command line mode to request the controller, because the value passing will cause verification errors, some verifications can use non-strict verification, and the validator will try to convert the available values
export class CliTestDTO extends DTO {
    @Expect(DTO.String().required())
    public id: string

    @Expect(DTO.Number().required().strict(false).description('please input number'))
    public count: number
}
The application should set the cli entry point and controller entry point as configured in the demo, as well as configure the controller
import { type ActionPattern, Application } from "lakutata";
import { ContextType, Controller } from "lakutata/com/entrypoint";
import { CLIAction, HTTPAction, ServiceAction } from "lakutata/decorator/ctrl";
import { CliTestDTO } from "../lib/dto/CliTestDTO";

export class TestController extends Controller {

    @CLIAction('test3', CliTestDTO)
    public async test3(inp: ActionPattern<CliTestDTO>) {
        if (this.context.type === ContextType.CLI) console.log('cli!')
        console.log(inp, this.context.type)
        return 'oh!!!!!!!!!!' + this.getEnv('TEST', 'abcd')
    }
}
cli command result:
[14:33:20.525] INFO (test.app/118897): Application test.app launched
> test3 --id 1231 --count 123131
TestOrmComponent init!
[14:33:44.739] INFO (test.app/118897): test.app
cli!
{ id: '1231', count: 123131 } CLI
ServiceAction
DTO supports method calls between services through sockets, so socket.io is built in. We inject it by using the DTO decorator,such like this:
export class TestController extends Controller {

    @ServiceAction({
        act: 'test',
        method:'test5'
    })
    public async test5(inp:ActionPattern<TestDTO>){
        console.log('test5',inp)
        return '5555'
    }
}
If you want to call it through a socket or another service’s socket, you need to keep the parameter object consistent. it means:
    //This object we will treat as the key to the matching method
   const key:object= {
            act: 'test',
            method:'test5'
    }
Other services and socket clients need this key to call the decorated methods in lakutata
//socket.io client demo
const socket = io('http://127.0.0.1:3001');

socket.on('connect', () => {
  console.log('Connected to the server');
});

socket.emit('message', 'Hello, server!');

socket.on('response', (data) => {
  // 从服务器接收到的数据
  console.log('Received data from server:', data);
});

socket.on('error', (error) => {
  // 从服务器接收到的错误信息
  console.error('Error from server:', error);
});
8. Time
lakutata core lib include Time tool class.you can get application’s uptime or import time lib inside your code.
Entrypoint
Entrypoint is a special component used to initialize the entry of cli, contorller, http, and service services, and map the methods with specified decorator characteristics in the service to metadata and actions. When Entrypoint is initialized, you can configure the handler content of the handler specified in the corresponding Entrypoint, and bundle the metadata given by the decorators of different actions into ActionPatternMap and ActionPatternManager to implement the execution of the action when the specified entry handler is running. For example, the route and Fastify routeMap configured in HttpAction
Application
    .env({TEST: '123'})
    .run(() => ({
        id: 'test.app',
        name: 'TestApp',
        timezone: 'auto',
        components: {
            entrypoint: BuildEntrypoints({
                controllers: [
                    TestController1
                ],
                http: BuildHTTPEntrypoint((module, routeMap, handler, onDestroy) => {
                    const fastify = Fastify({
                        logger: false
                    })
                    routeMap.forEach((methods: Set<any>, route: string) => {
                        methods.forEach(method => {
                            fastify.route({
                                url: route,
                                method: method,
                                handler: async (request, reply) => {
                                    const ac = new AbortController()
                                    reply.raw.on('close', () => {
                                        console.log('close')
                                        ac.abort()
                                    })
                                    return await handler(new HTTPContext({
                                        route: request.routeOptions.url!,
                                        method: request.method,
                                        request: request.raw,
                                        response: reply.raw,
                                        data: {...As<Record<string, string>>(request.query ? request.query : {}), ...As<Record<string, string>>(request.body ? request.body : {})}
                                    }), ac)
                                }
                            })
                        })
                    })
                    fastify.listen({port: 3000, host: '0.0.0.0'})
                    onDestroy(async () => {
                        await fastify.close()
                    })
                }),
                cli: BuildCLIEntrypoint((module, cliMap, handler, onDestroy) => {
                    const inf = createInterface({
                        input: process.stdin,
                        output: process.stdout
                    })
                        .on('SIGINT', () => process.exit(2))
                        .on('line', input => {
                            try {
                                const CLIProgram: Command = new Command().exitOverride()
                                cliMap.forEach((dtoJsonSchema, command: string) => {
                                    const cmd = new Command(command).exitOverride()
                                    for (const p in dtoJsonSchema.properties) {
                                        const attr = dtoJsonSchema.properties[p]
                                        cmd.option(`--${p} <${attr.type}>`, attr.description)
                                    }
                                    cmd.action(async (args) => {
                                        //Handle cli
                                        await handler(new CLIContext({command: command, data: args}))
                                    })
                                    CLIProgram.addCommand(cmd)
                                })
                                CLIProgram.addCommand(new Command('exit').allowUnknownOption(true).action(() => process.exit()))
                                CLIProgram.parse(input.split(' '), {from: 'user'})//使用命令行传入的参数进行执行
                            } catch (e: any) {
                                DevNull(e)
                            }
                        })
                    onDestroy(() => {
                        inf.close()
                    })
                }),
                service: BuildServiceEntrypoint((module, handler, onDestroy) => {
                    const httpServer = createServer()
                    const server = new SocketIOServer()
                    server.on('connection', socket => {
                        socket.on('message', async (data, fn) => {
                            return fn(await handler(new ServiceContext({
                                data: data
                            })))
                        })
                    })
                    server.attach(httpServer)
                    httpServer.listen(3001, '0.0.0.0')
                    onDestroy(async () => {
                        server.close()
                    })
                })
            })
        },
        bootstrap: [
            // 'testModule',
            // 'testComponent',
            // 'testProvider',
            'entrypoint'
        ]
    }))
Not only HttpAction, but also ServiceAction and CliAction. They are similar
Decorators
There are many types of decorators, including asst,ctrl,di, dto,orm.
1. asst
asst include: before and after,These auxiliary methods are usually used for logging, permission checking and other functions. They can be executed before or after the method is executed to record or process important information, such as the number of method calls, execution time, etc.
Here we give an example of authentication
import { Exception } from "lakutata";

//Defining an exception class
export class NoAuthorizationException extends Exception {
    public errno: string | number = 'E_NO_AUTHORIZATION'
}
import { NoAuthorizationException } from "../lib/exception/NoAuthorizationException";

export class AuthComponent {

    // TODO: Implement AuthComponent

    //check if user is authenticated
    public static isAuthenticated() {
        //check user is authenticated
        const isAuthenticated = false;//for example:it's true
        if (!isAuthenticated) {
            throw new NoAuthorizationException('Not Authenticated')
        }
    }
}
Call this decorator and authentication method in our test controller
    @HTTPAction('/test6', 'GET')
    @Before(AuthComponent.isAuthenticated)  //Use the verification method of the authentication component before calling the test6 method
    public async test6(inp: ActionPattern<TestDTO>) {
        console.log('test6', inp)
        return '6666'
    }
result
{
    "statusCode": 500,
    "error": "Internal Server Error",
    "message": "Not Authenticated"
}
2.ctrl
ctrl include:cli、service、http.These decorators usually need to match the corresponding Entrypoint component. After declaring the method, add the attributes to the method metadata, and call the corresponding entry component through the matching information in the service instance.
3.di
There are four basic decorators for dependency injection: Autoload, Configurable, Inject, and Lifetime.Based on the BaseObject type, set the target object through Reflect.defineMetadata to implement constructor injection
Autoload When you use the autoload class decorator, you do not need to declare the component you are going to reference in the configuration file.
Configurable
Inject The Inject decorator will query whether there is a corresponding instance of the specified type of metadata. If not, a new instance will be created and injected into the metadata container, and the instance will be returned to the object variable. The inject decorator can define names or further process function declarations to solve some problems. such like that
export class TestOrmComponent extends Component {

  @Inject('db', function (db) {
    return db.getRepository(InterfaceInfo)
  })
  public InterfaceRespostry: any

  public async sh() {
    const data = await this.InterfaceRespostry.findAndCount({})
    console.log('sh test', data)
  }
}
Lifetime The Lifetime class decorator is used to set the scope of application of the class, the usage cycle and the usage mode of the instance,lakutata life time included:ApplicationSingleton、ModuleSingleton、Singleton、Transient、Scoped.
@Lifetime('SINGLETON',true)
export class AuthComponent extends Component {
}
Application singleton Application singleton means that the life cycle of this object runs through the entire application operation process
Module singleton Module singleton means that an instance of this type will exist and be callable within the declaration lifecycle of this module and will be destroyed along with the module.
Transient Transient only exists during the execution of an action and will be destroyed after the execution is completed.
Scoped Each new call to a scoped class or module will create a new instance. Repeated requests for the same scoped class or module during the same call will not create a new instance.
3.DTO
There are four types of DTO: Accept, Expect, IndexSignature, Return
Accept is a method decorator used to verify whether the passed parameters meet the DTO validation standards
    @Accept(ContainerTTYConsoleSizeOptions.required())
    public async testAcce(options: ContainerTTYConsoleSizeOptions): Promise<void> {
        await this.#exec.resize({
            w: options.cols,
            h: options.rows
        })
    }
// ContainerTTYConsoleSizeOptions
import {DTO} from '../../../../lib/core/DTO.js'
import {Expect} from '../../../../decorators/dto/Expect.js'

export class ContainerTTYConsoleSizeOptions extends DTO {

    @Expect(DTO.Number().required())
    public cols: number

    @Expect(DTO.Number().required())
    public rows: number
}
We use Accept to validate method parameters, and Expect to define what data and format a DTO attribute requires.
IndexSignature set a metadata that contains the object index signature defined by the Schema. The implementation uses TypeScript’s type system and generics to better express type information. This ensures that when creating an object, the property signature passed in does not conform to the expected pattern or structure.
The Return decorator is used to verify whether the return value meets the requirements. If not, an exception is thrown to avoid other errors.
        class TestClass {
            @Return(TestDTO.required())
            public testReturn(out: any): TestDTO {
                return out
            }
        }
orm
Lakutata integrates the typeorm decorator and can be called directly,here is typeorm decorator doc
Error
The exception class is provided, and you can extend the exception method by yourself.
import { Exception } from "lakutata";

export class NoAuthorizationException extends Exception {
    public errno: string | number = 'E_NO_AUTHORIZATION'
}